Tuesday, March 27, 2012

Tech: Front Turn Signal Relocation

I finally bought the relocation kit to finish my turn signal project. I went over the rear turn signals in an earlier post. I will go over the front today.

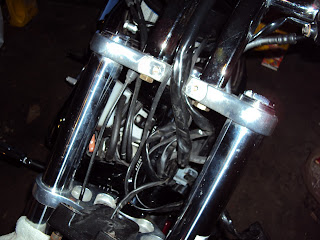
Here is a picture before I started the project.


I first started by unscrewing the turn signals.


Then I removed the left front side cover and the air box cover. I was able to follow the wires from the lights to the plug and unplugged them. Make sure you mark the plug so you wire the new pug correctly. Both lights share the same plug, with three wires each. A couple of zip straps needed to be cut.


I could have cut the old wires and removed them easily, but I wanted to keep them as one unit so I had to unbolt the headlight and headlight bracket to give myself some room to work with.


Once the old parts were removed I bolted the new mount to the new light snugly, but loose enough I could adjust it when I placed it against the bike. When I had the angle I wanted, I tightened the bolt and then bolted the mount to the triple tree. The instructions say to run the wires above the bottom triple tree, but I went underneath. I fed the wires up to the air box and used new zip ties to keep the wires where I wanted them. I cut about 12" of wire off so that there wasn't so much to tuck into the frame before crimping the plug ends and then pressing them into the new plug that comes with the turn signal kit.


When the wiring was done I bolted the headlight mount back on as well as the headlight. Refer to the service manual for the headlight alignment.

Here are a few pictures of the new lights.


I like that the front lights sit like the rear lights do, almost as if I planned it that way...

Sunday, March 18, 2012

Harrisburg Super Swap 2012

Don't forget about the Harrisburg Super Swap this coming weekend.

http://syracusesuperswap.com/05indexhar.htm

I have not been to this one yet, but hoping to get there this weekend. Maybe I will see you there!


On a side note, what a beautiful weekend. I was able to get some outside work done around the house and I was able to get some work done on my front fiberglass fender too. Saturday afternoon I took my lovely fiance out on the bike for a little over an hour. On Sunday I took three different rides, one with each of my kids. Soon the fiance's daughter will be home and bummed about not getting a ride.

Enjoy life, be safe and I hope to see you out there.

Monday, March 12, 2012

Product Review: Kuryakyn 4" Adjustable Peg Offsets

Anyone who has ridden on the back of a VRSC for a long ride will agree, the stock foot peg location is uncomfortable. I have debated a few different options from making a full custom hanger to replace the existing mount, to looking at what other companies provide. I liked the way the Kuryakyn Offsets looked so I thought I would give that a try.

I looked around on the Internet for the best price and found BKRider. http://www.bkrider.com/bkrider/index.asp

The price of $65 plus shipping didn't seem too bad. I would give the price a 8 out of 10.

The package came about a week later. The box was a UPS 18" x 13" x 3". It arrived a bit beat up. Almost standard for UPS handling.


The only protective packaging was a piece of brown paper.


The packaging was very poor. The parts come inside a plastic cover stapled onto a cardboard back plate. Some staples had popped out from the rough handling and poor packing and parts had been floating around in the box. I give the packaging a 4 out of 10.

I took a picture of the parts after I put them back in the Kuryakyn package.


This comes with instructions but I doubt you would need them. The instructions are easy to follow and have nice pictures to show how they mount, the parts and how not to adjust the offsets. It does cover the limited warranty in the instructions. I give the instructions a 8 out of 10.


10 parts make up the Kuryakyn offsets including chrome hot spots to cover the bolt heads and anti-seize compound. The main parts are a cast metal that have been chromed and polished. These parts are of a good quality. The bolts and spring washer are made of stainless steel. I will say that the spring washer is very thin and weak. If you have an extra set of foot peg springs, you may want to use those instead. For the quality of parts I give it a 8 out of 10. I would have given a 9 if the spring washer was more effective.


I mounted these on my bike easily. They bolt onto the original foot peg mount. Both ends of the offsets rotate and have splines between the moving parts so that when you tighten the bolts, they will not rotate. Once you have the position you want, you can mount the pegs and install the chrome hot spots on the bolt heads. For the ease of installation and the many positions you can move these into I give a 9 out of 10.


For the value of the product, price vs. quality, I think you get a nice part. I did not find any other parts that were as versatile as these for the price. The value I give a 9 out of 10.

That gives a grand total of 7.67%. The packaging from BKRider really brought this rating down.

Here are a few more pictures.


If you would like for me to review and rate one of your products, you can contact me at budki@roadrunner.com. Please use the title "product review (product)" so I do not think it is spam.

The Kuryakyn offsets are very nice and my fiance loves the the new location of the foot pegs. Personally I was not happy with the way these looked on my bike. If the bike had saddle bags on it, I think I would not mind how far they sick out from the bike. I will use them for my rider until I can make some custom relocaters that hug the bike a bit more.

Wednesday, March 7, 2012

Tech: Spedometer Plate


When I bought my bike, it was used and the original owner had replaced the stock handle bars with a high rise and drag bar. To mount the speedometer he ground the original upper bar clamp and drilled 2 holes in it so he could bolt it to the new upper bar clamps.


I did not like the way this looked and when riding the bike, the angle of the face of the speedometer did not sit very nicely. I wanted something a little better, so I decided to make a speedometer plate to mount my speedometer to. The old owner had drilled and taped the new upper handle bar clamps, so I decided to start there.


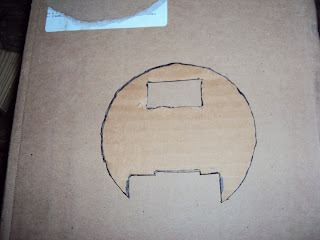
I traced the bottom of the speedometer with a marker on cardboard. Then I cut it out and made adjustments so that it would fit to the back of the speedometer. When I was happy with the fit I traced the cardboard onto a flat piece of aluminum, about 15 or 16 gage. I cut this on my table jig saw and filed the edges until I had a good fit. After that I drilled the holes. 


There is one taped hole on the top of the speedometer housing that I could use for mounting to the new plate but there really wasn't much else to hold it tight so I drilled  two holes and taped them in the housing. Tip: if you bolt the plate and housing together (with the gages removed) you can drill trough both at the same time to have a good location. I used 8-32 button head screws for a low profile look.


After I was done cutting, drilling and filing I sanded and buffed the plate with a cotch brite wheel on a grinder (a sheet of scotch brite and doing it by hand would work) before painting it black.


Here is just the plate mounted.


And with the speedometer mounted.


Can you see the button head screws?


Here is a comparison of the two. The top picture is with the plate and the bottom is the before picture. You can see the angle changes and the speedometer sits lower.


The original mount did hide the speedometer connector. I am not sure what I want to do with this yet, but I'm sure I will post it when it is done. I could shrink wrap it, or make a plate, or machine something to bolt on. I am not sure yet.

Saturday, March 3, 2012

Adsense by Google

I started this blog so that I could share my thoughts and experiences with others. When I found out I could have ads on it that would be relevant to the subject matter that readers could could check out if interested, I was a little excited. The thought of earning a little money on the side from it was a bonus.

I can usually figure things out eventually, but I am not a computer wiz by any means. It took me about 5 hours to sign up, set up and read the very long and confusing "how to" instructions for AdSense (by the end of it I didn't know if I had to enter source code or it it would be applied automatically).

I had to wait a few days before getting approved. When the approval came I have to admit I was a bit excited. I logged in and noticed only a few of the ads had anything to do with motorcycles, the whole theme of this blog. Things like "get your degree" and "Ford truck" ads were popping up. I thought, "OK I will give it some time and the ads will get better".

Meanwhile I was set on getting the word out about my blog to get more readers aware of it's existence. I posted on Facebook, Google+, V rod forums and by word of mouth. At first it was slow going.

Fast forward a month. Now I am getting a few regulars visiting the site. I am getting feedback from friends on what they think. I have gotten new friends on Facebook through the blog. And even though the ads never completely adjusted to motorcycle content like it was supposed to (about half or less were motorcycle related) I had started to build up a little money in my AdSense account. About $32 over the month.

On Wednesday night I decided I would fill out the tax information so that AdSense could send a check to me when it was ready. I filled out everything except the PIN number because I wasn't sure where I put it and everyone was sleeping, so I decided to wait to finalize it. The next morning, only a few hours later, I logged in to finalize the account only to find out I my account is disapproved!

I am normally a level headed guy, but when I read that I got a little fired up. What did I do wrong? How do I remedy this? Where do I go for answers? Here we go with the automated "how to" again. I looked around to find out what I had done wrong, I was unable to find the answer. Filled an appeal, and received and automated email saying my appeal was denied. The only explanation was that they cancelled my account to protect their customers, the owners of the ads, from fraudulent exposure.

Now, if Google wants to suspend me for a given time for something I did wrong, I am fine with that. Just let me know what I did wrong so I do not do it again. I understand protecting the customer, but shouldn't they be willing to work with the content providers that create the content that draws potential customers?

You get one chance to get it right. It would be like you get your driver's license, but if you do one violation (and no one tells you what the violation was) you lose your driving privileges for the rest of your life. No explanation other than "for the safety of the other drivers, we no longer feel you should have a license".

Or taking a test that has two answers to each question. As long as you keep answering correctly you can move to the next one. One wrong question and you get kicked out of class for life, except in this situation you would at least have a clue what question you got wrong.

I am not upset about the money. I am not upset about the pulling of the unrelated ads. When an ad was motorcycle related I was happy for my readers (one ad was for Ghost Rider Customs and another was for Bell Helmets and another was for saddle bags) because it gave them new resources. What does bother me is automated responses. What bothers me is there is no effort to help new people understand how this stuff works. What bother me is that AdSense hides behind secrecy to protect their spy software that they use to monitor what we do.

I may have violated the regulations, but honestly, I have no idea what it would have been. If I was allowed to know what it was, I would learn and adapt so that it didn't happen again. If it was something one of my readers did, I would make an effort to keep it from happening again. But that does not happen. Google AdSense make no effort to explain the violation and when I try to get answers, the automated responses are so general you just go in circles, getting no real information, just the explanation that they can tell you nothing so they do not compromise their spyware.

Since this has happened on Thursday I had expressed my frustration to a few people. I was surprised at how many other people had the same thing happen to them or someone they know. Of the people I had talked to that knew what AdSense was had nothing good to say about it.

The above is my personal experience and my personal opinion of AdSense. I you feel differently, please feel free to post a comment. If you or someone you know has had a similar experience, I hope you too will post a comment.

I know this is a long post and a long rant. Thank you for making it this far. To sum it up, I would like to say the theory of AdSense is a nice one, but the way it is set up and handled, it is not friendly to the average Joe who is new to this kind of stuff. I feel I waisted a lot of my time with AdSense. If you try it, good luck. You will get very little if any help from Google AdSense and if you mess up once, you are done for good.

Friday, March 2, 2012

First Ride of 2012

Let me start off by saying I had a rough week this week. At work things have slowed down and even though it happens every few months and I have been in the machining trades for 12 years, it still bothers me every time. At home my teen age son has been getting into trouble. I had a lot of pent up negative energy.

This morning I woke up just hoping that the temperature would break the 40 degree mark so I could get the bike out. No such luck. It only made it to 35 degrees by the time I had to leave for work and I do not have good cold weather gear, so I was a bit disappointed to start the day off. All day at work I watched the temperature rise and the sun came out. It was making me itch like poison ivy.

At the end of the work day I almost ran for the door. On the drive home I noticed the temperature was up to 50, but the clouds were rolling in.

When I got home I went in the house and said "hi/bye" to my fiance and ran out the door to the garage. Fired the bike up and away I went.

I decided to hit some back roads because there was a storm warning for later and I figured the trees would help with the high winds when they got here. I rode to Chestnut Ridge, a local state park, and rode through there. As I rode around, parents were at the play grounds with their little children. Walkers were out, some with pets.

My first stop was a little parking spot with just a bench. Awhile back after a night of all you can eat crab legs, this is where I proposed to my fiance. It looks much nicer in the summer.


I rode around a bit more. The roads were not bad. There was a bit of buckling in the roads and the turn arounds were a mess. The turn arounds still had snow and ice in spots, so to avoid those I had to ride through the mud and muck. Wide street tires are not meant for that deep mud. I couldn't imagine what a 300 tire would do in the mud.


On the way out I had to stop and take a picture of far off Buffalo, New York. To the left of the tree you can barely make out Lake Erie.


I was out for almost an hour so I decided to head home and get some dinner. On the ride home the winds were picking up and the temperature was dropping quickly. By the time I got home, the temperature was 45 degrees. This was the first time I rode with out the small wind shield on. I noticed it in my chest at higher speeds, but the new full face helmet did it's job well.

I also took a picture of the muddy fender for giggles.


I don't know why or what does it, but when I was done riding I felt so much better. I was so happy to be able to get out today. Unfortunately there is a storm rolling in and I will not be able to get the hose out and wash the bike down. Oh well, it will be there next time.

Ride safe and maybe I will see you out there.